Pset 4이 왜 이렇게 늦었냐면... 코딩에 약간 벽을 느끼고 1보 후퇴했기 때문..
ㅎㅎ 사실 논 건 아니고 매일 시간 내서 문제를 풀려고 노력은 했지만 너무 어려워서 한참 걸렸어요..ㅠㅠ
뒤로 갈수록 배운 거에서 나오는 게 아니고 응용을 요구합니다 !!!
약간.. 개념 배우고 심화 문제 나오는 수능같은 그런 느낌
진짜로 literally 손으로 머리 싸매고 낑낑댐..
어쨋든 어제 두세시간을 쏟고 마지막 과제를 제출하고 나서야 문풀 리뷰를 할 수 있게 되었네용
리뷰하면서 못 다한 이해를 해보도록 하겠습니다 ^~^
1보 후퇴엔 3보 전진~~
레츠고 !
4-1) Volume
: 볼륨 조절하기
WAV files store audio as a sequence of “samples”: numbers that represent the value of some audio signal at a particular point in time. WAV files begin with a 44-byte “header”, and after the header, it contains a sequence of samples, each a single 2-byte (16-bit) integer representing the audio signal at a particular point in time. Scaling each sample value by a given factor has the effect of changing the volume of the audio. Write a program to modify the volume of an audio file.
<Distribution code>

- The program should accept three command-line arguments. (input, output, factor)
- The program should read the header from the input file and write the header to the output file.
- The program should then read the rest of the data from the WAV file, one 16-bit(2-byte) sample at a time. It should multiply each sample by the factor and write the new sample to the output file.


★ atof() : used to convert a string into a floating-point number
//TODO #1
: Copy header from input file to output file
uint8_t header[HEADER_SIZE];
fread(header, HEADER_SIZE, 1, input);
fwrite(header, HEADER_SIZE, 1, output);
* HEADER_SIZE는 이미 44로 defined 됨.
★Parameters of fread ()
fread(a pointer to a block of memory, size of each element, number of elements, a pointer to the FILE object);
//TODO #2
: Read samples from input file and write updated data to output file
int16_t buffer;
while (fread(&buffer, sizeof(int16_t), 1, input)
{
    buffer *= factor;
    fwrite(&buffer, sizeof(int16_t), 1, output);
}
4-2) Filter-less
: 사진에 필터 입히기
A file format (like BMP, JPEG, or PNG) that supports “24-bit color” uses 24 bits per pixel. A 24-bit BMP uses 8 bits to signify the amount of red in a pixel’s color, 8 bits to signify the amount of green in a pixel’s color, and 8 bits to signify the amount of blue in a pixel’s color. If the R, G, and B values of some pixel in a BMP are, say, 0xff, 0x00, and 0x00 in hexadecimal. In this problem, you’ll manipulate these R, G, and B values of individual pixels, ultimately creating your very own image filters.
<Distribution code>


//TODO #1
: Implement grayscale (흑백 필터)
We should make sure the red, green, and blue values are all the same value. But what value to make them?
→ If the original red, green, and blue values were all pretty high, then the new value should also be pretty high. If the original values were all low, then the new values should also be low.
You can take the average of the red, green, and blue values of each pixel to determine what shade of grey to make the new pixel.
//Loop over all pixels
for(int i = 0; i < height; i++)
{
	for(int j = 0; j < width; j++)
    {
	//Take average of red, green, and blue
    int average = round((image[i][j].rgbtRed + image[i][j].rgbtGreen + image[i][j].rgbtBlue) / 3.0);

    //Update pixel values
    image[i][j].rgbtRed = average;
    image[i][j].rgbtGreen = average;
    image[i][j].rgbtBlue = average;
    }
}
The result being like :

//TODO #2
: Implement Sepia (오래된 붉은갈색 느낌 필터)
For each pixel, the sepia color values should be calculated based on the original color values per the below:
sepiaRed = .393 * originalRed + .769 * originalGreen + .189 * originalBlue
sepiaGreen = .349 * originalRed + .686 * originalGreen + .168 * originalBlue
sepiaBlue = .272 * originalRed + .534 * originalGreen + .131 * originalBlue
The results may not be an integer, but each value could be rounded to the nearest integer.
//Loop over all pixels
for (int i = 0; i < height; i++)
{
	for (int j = 0; j < width; j++)
    {
    	//Compute sepia values
        int sepiaRed = round(.393 * image[i][j].rgbtRed + .769 * image[i][j].rgbtGreen + .189 * image[i][j].rgbtBlue);
        int sepiaGreen = round(.349 * image[i][j].rgbtRed + .686 * image[i][j].rgbtGreen + .168 * image[i][j].rgbtBlue);
        int sepiaBlue = round(.272 * image[i][j].rgbtRed + .534 * image[i][j].rgbtGreen + .131 * image[i][j].rgbtBlue);

        if(sepiaRed > 255)
        {
        	sepiaRed = 255;
        }

        if(sepiaGreen > 255)
        {
        	sepiaGreen = 255;
        }

        if(sepiaBlue > 255)
        {
        	sepiaBlue = 255;
        }

        //Update pixel with sepia values
        image[i][j].rgbtRed = sepiaRed;
        image[i][j].rgbtGreen = sepiaGreen;
        image[i][j].rgbtBlue = sepiaBlue;
    }
}
The result being like:

//TODO #3
: Implement Reflect (수평으로 뒤집힌 필터)
- Any pixels on the left side of the image should end up on the right, and vice versa.
//Loop over all pixels
for (int i = 0; i < height; i++)
{
	for (int j = 0; j < (width/2); j++)
    {
    	//Swap pixels
        RGBTRIPLE temp = image[i][j];
        image[i][j] = image[i][width-j-1];
        image[i][width-j-1] = temp;
    }
}
★ Notice that j loop is until (width/2) because only half of the pixels of a row should be reflected!
★ image[i][width-j-1] means the pixel on opposite side of a row.
The result being like:

//TODO #4
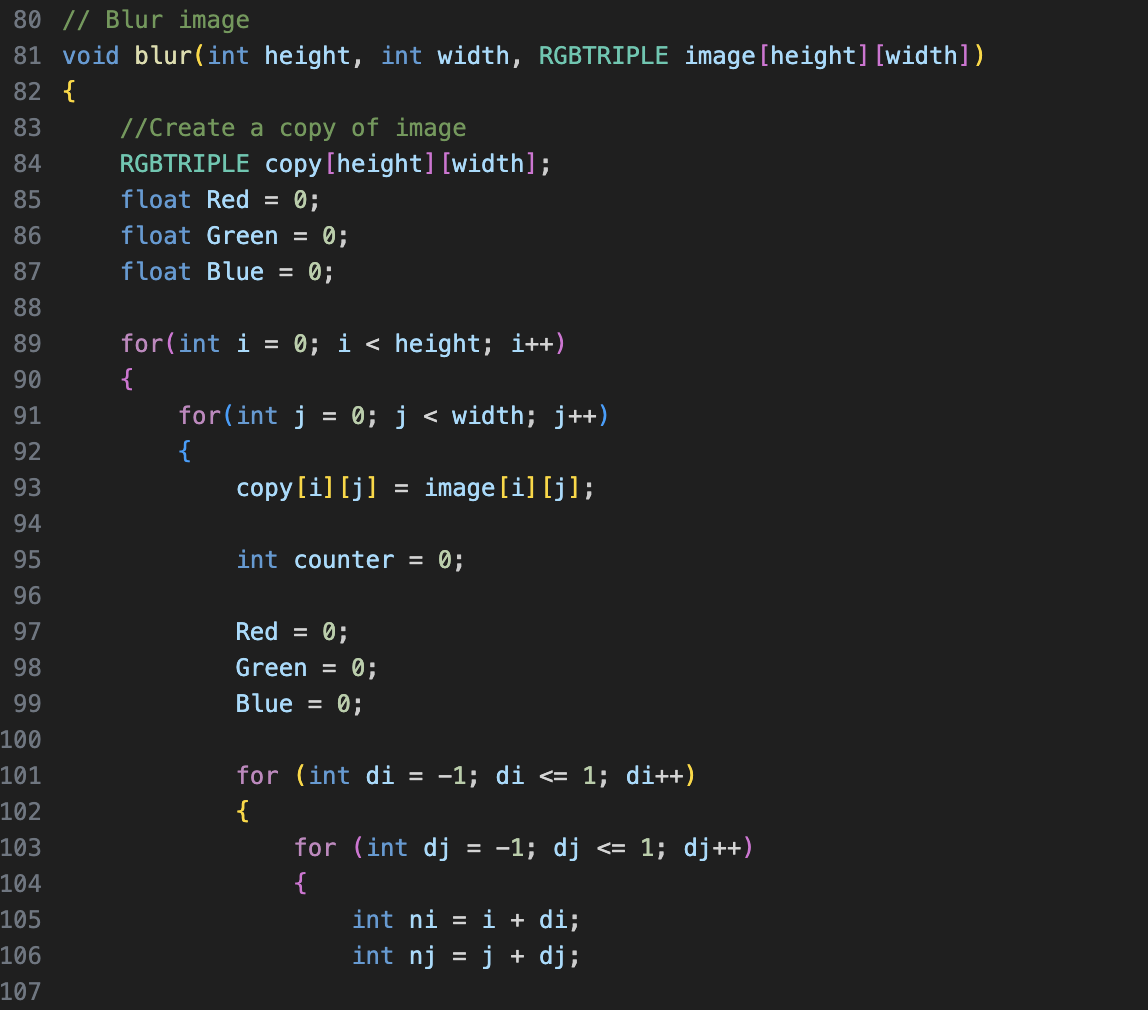
: Implement Blur (블러 처리된 필터) ★
가장 어려워서 며칠간 고민했던 부분!!
We will use "box blur", which works by taking each pixel and, for each color value, giving it a new value by averaging the color values of neighboring pixels.

The new value of each pixel would be the average of the values of all of the pixels that are within 1 row and column of the original pixel (forming a 3x3 box).
Ex) For pixel 6 : new value of averaged the original color values of pixels 1,2,3,5,6,7,9,10, and 11.
For a pixel along the edge or corner, like pixel 15 : pixels 10,11,12,14,15and 16.
We are going to create a copy of image:
//Create a copy of image
RGBTRIPLE copy[height][width];
for(int i = 0; i < height; i++)
{
	for(int j = 0; j < width; j++)
    {
    	copy[i][j] = image[i][j];
    }
}
Let's write psedocodes first, stey-by-step!
//전체 이미지의 각 픽셀 iterate

	//copy 만들기

    //3x3 box 픽셀 iterate

    	//픽셀이 valid한 경우 (edge case, corner case 포함)

        	//각 픽셀에 새로운 RGB 값 할당

        //각 RGB 값의 평균을 copy에 직접 할당

        //전체 픽셀에 대해 copy 값을 image 값에 원래대로 할당
즉, 전체 이미지에서 3x3 사이즈의 픽셀 박스를 iterate하면서 각 RGB값의 평균을 새로이 할당하고, 마지막에는 copy에 할당한 값을 원래대로 image에 돌려놓으면 됩니다!
① 3x3 box 픽셀 반복문

★새로운 변수 int di, int dj를 만들어서 상하좌우 한 칸씩을 뜻하는 -1부터 1까지 반복하는 box iteration을 만든다.
★이것을 전체를 반복하는 변수 i와 j에 더하여 전체 픽셀을 한정적인 3x3 box로 반복할 수 있게 새로운 변수 ni, nj로 정의한다.
② valid pixel 조건문
: 유효한 픽셀이라는 것은 edge나 corner 픽셀의 경우도 포괄해야 함을 뜻한다.
이는 새로이 정의된 변수 ni, nj가 0보다 크거나 같고 각각 height, width보다 작아야함을 의미한다.

③ 새로운 RGB 값 할당하기
: 먼저, 새로운 RGB값을 담아둘 변수 Red, Green, Blue를 정의한 후 각각에 값을 할당한다.

: float으로 정의한 이유는 각 값이 딱 정수로 떨어지지 않을 수 있기 때문. 이렇게 정의하면 정확도가 올라갈 수 있다.

: 각 픽셀의 빨간색, 초록색, 파란색 값을 각각 Red, Green, Blue에 더해준다.
④ counter 만들기
: 평균을 구하기 위해서는 몇 개의 유효한 픽셀의 RGB 값이 더해졌는지 알아야 한다.
따라서, 유효한 픽셀을 카운트 할 때마다 counter 변수를 하나씩 업 시켜준다.
먼저, counter 변수를 0으로 정의한다.

: 중요한 것은 counter을 0으로 정의하는 위치이다. 각 box를 반복한 후에 다시 0으로 reset 해야하기 때문에 box iteration 앞에 정의한다.

: 유효한 픽셀 조건문 안에 counter ++를 해준다.
⑤ RGB 값 평균 구하고 할당하기
: RGB 값의 평균은 직접적으로 copy에 할당한다. 이 때 주의할 점은 변수 Red, Green, Blue 값이 float 이기 때문에 round()를 통해 가까운 정수로 변환해준다.

: 이 때에도 중요한 것은 위치이다. Box iteration 바깥에서 copy에 할당해준다.
⑥ copy 값을 image 값으로 옮기기

: 각 픽셀의 값을 다 옮겨 할당해야 하므로, 전체 픽셀을 반복하는 for문 아래에서 할당시켜준다.
완성된 Blur 코드를 전체적으로 보면 다음과 같다:

The result being like:

4-3) Recover
: 삭제된 사진 복원하기
We spent the past several days taking photos around campus, all of which were saved on a digital camera as JPEGs on a memory card. Unfortunately, we somehow deleted them all! We’re hoping (er, expecting!) you can write a program that recovers the photos for us!
(약간 초등학교 수학 문제중에 달력을 찢었다.. 이런 거 생각났다 ㅋㅋㅋㅋㅋㅋ 왜 찢어.. 왜 삭제해..)
Background
- JPEGs have "signatures", patterns of bytes that can distinguish them from other file formats. The first three bytes of JPEGs are 0xff, 0xd8 and 0xff.
- The fourth byte is either 0xe0, 0xe1, 0xe2, 0xe3, 0xe4, 0xe5, 0xe6, 0xe7, 0xe8, 0xe9, 0xea, 0xeb, 0xec, 0xed, 0xee, or 0xef. The fourth byte's first four bits are 1110.
- Digital cameras only write to cards in units of 512 B. (block size = 512 bytes)
→It means you can read 512 of memory card's bytes at a time for efficiency's sake.

위 그림처럼 각 색이 각 JPEG 파일을 의미한다. JPEG가 시작하는 블럭이 있고, 시작하지 않는 블럭이 있다.
Let's write psedocodes first!
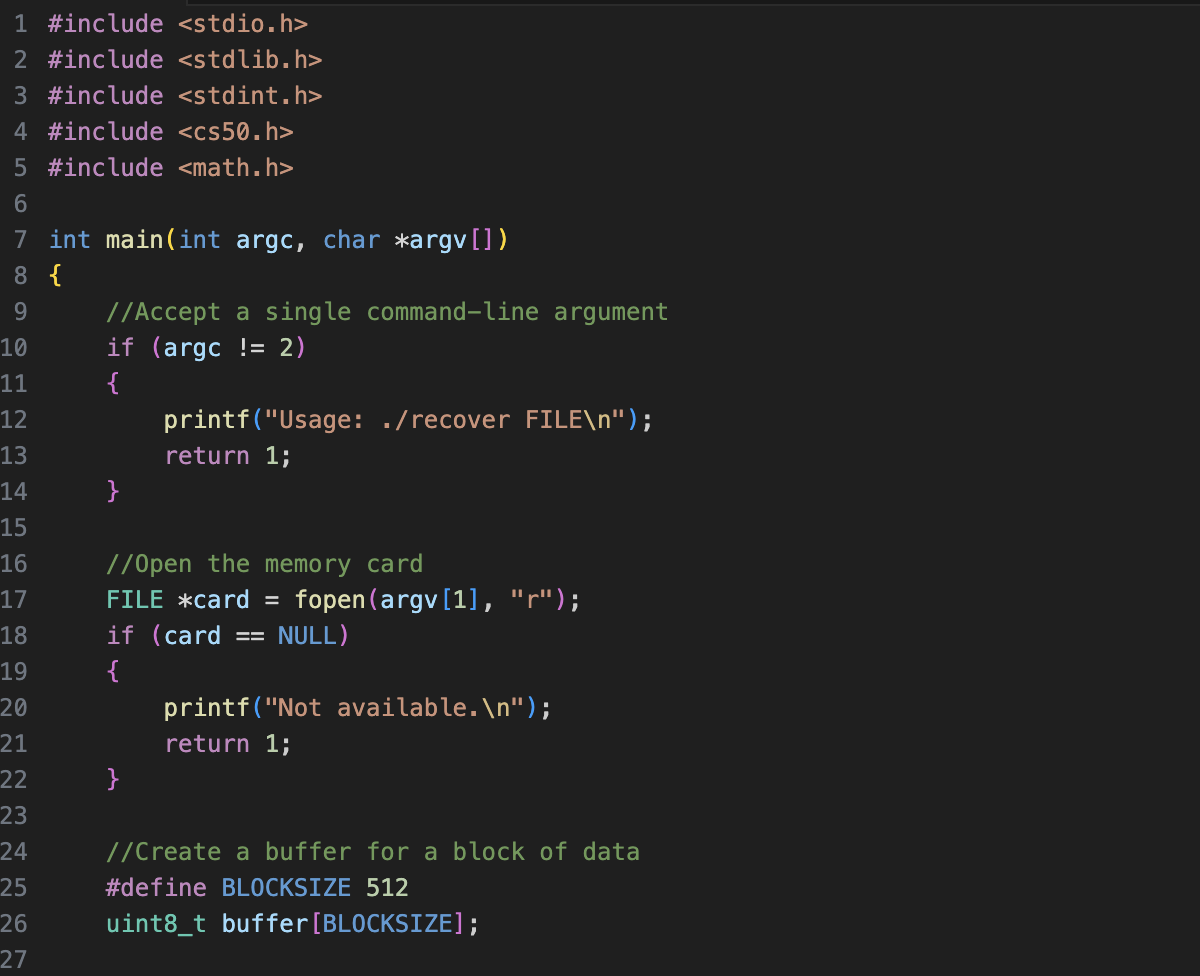
//Accept a single command-line argument

//Open the memory card

//While there's still data left to read from the memory

	//Create JPEGs from the data
① single command-line argument
: 하나의 command-line argument가 아닐 시 에러 메세지로 경고한다. (argc != 2)

② open the memory card
: card memory로 가서 argv[1]을 여는데, read 모드로 연다. ("r") 만일 file이 제대로 열리지 않을 시 에러메세지로 경고한다.

③ memory에서 더 이상 읽을 데이터가 없을 때까지 조건문
: 파일에서 데이터를 읽을 때, 일시적으로 그 데이터를 보관할 "buffer"가 필요하다. 데이터가 512 bytes로 저장되어 있으므로, 해당 사이즈로 buffer을 만들면,
uint8_t buffer[512];이렇게 만들 수 있겠지만, 코드에 constant(magic number)를 쓰는 것은 바람직하지 않으므로 보완하여 다시 쓸 수 있다.

★ Notice that there's no ; when you use #define
그 다음, fread()를 사용하여 계속해서 남은 데이터를 읽는다. 이 때, fread() returns the number of bytes it has read, so make sure that the condition is equal to BLOCKSIZE(512).

④ If start of new JPEG
: 앞에서 memory block은 JPEG의 시작일 수도, 아닐 수도 있다고 언급했다. 먼저 JPEG의 시작일 경우 조건문을 생각해보자.
buffer[BLOCKSIZE] 중 첫 번째~세 번째의 bytes는 알고 있다.
if (buffer[0] == 0xff && buffer[1] == 0xd8 && buffer[2] == 0xff && buffer[3] == ?)
여러가지 경우의 수가 있는 네 번째 byte는 어떻게 표현할까?
★ bitwise arithmetic (operation) = 비트 연산
: bit 단위로 연산을 할 때 사용되는 연산자.
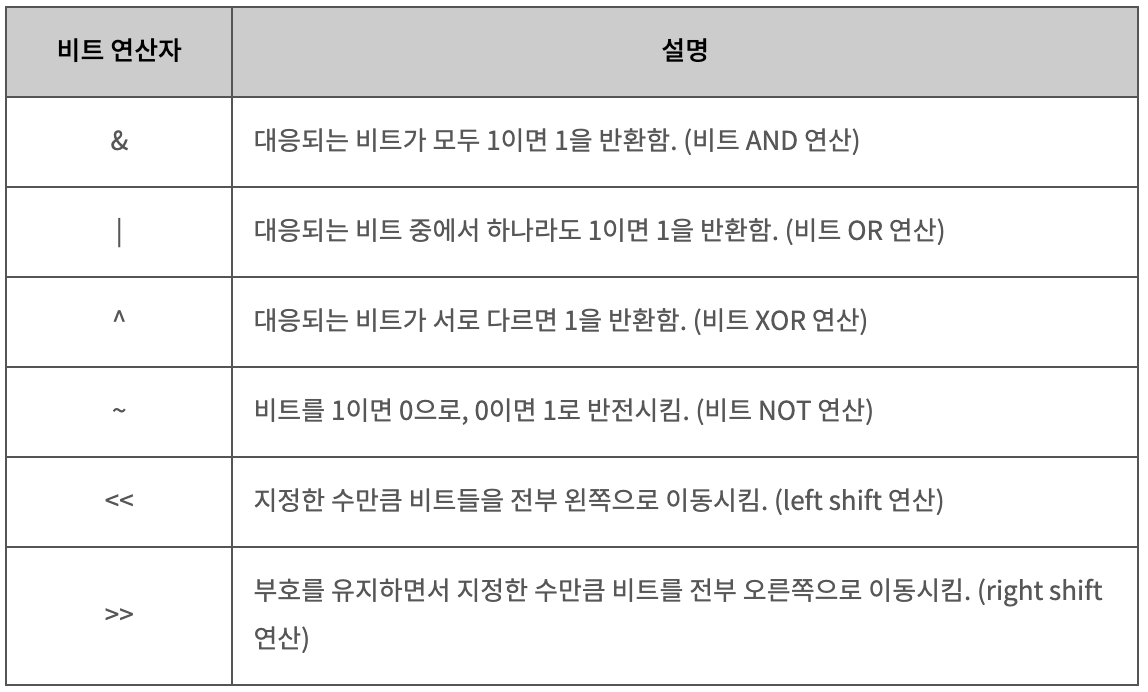
&는 대응되는 비트가 모두 1이면 1을 반환한다. 예를 들어보자.
| byte | binary |
| 0xf0 | 1111 0000 |
| buffer[3] | whatever |
| 0x 0 | 1111 0000 |
0xf0을 binary로 변환시키면 1111 0000이 되는데, 이는 buffer[3]가 뭐가 됐든 대응했을 때 결과가 1111 0000이 나온다는 것을 의미한다. 이는 결국 0x. 0으로 나올 것인데, 앞에서 0xe. 라고 했으므로 0xe0이 될 것이다.
따라서 다음과 같은 조건문을 쓸 수 있다:

JPEG이 시작됐을 경우, 순서에 맞게 파일을 새로운 이름으로 저장해야 한다. 순서를 알기 위해 먼저 counter을 정의해서 파일 수를 센다.
★ 000부터 시작해야 하므로 counter = -1로 정의한다.
또한, 파일을 넣어둘 변수 filename과 새로 쓴 JPEG 파일을 저장할 새로운 파일 outputFile을 정의한다.


★ %03i.jpg : %03을 앞에 붙이는 것은 세 자리 int 자리를 의미한다.
그리고 outputFile에 새로이 쓴다:

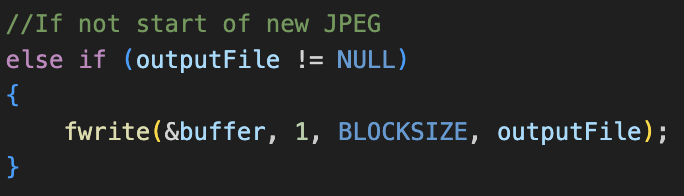
이미 JPEG파일을 찾은 경우
: outputFile을 닫는다. 하지만 이 부분은 새로운 파일을 열기 전에 먼저 실행되어야 하므로 앞의 fwrite 앞에 위치한다.

새 JPEG 파일의 시작점이 아닌 경우 (중간 혹은 끝)
: 계속 write 한다.
⑤ 열어둔 파일을 모두 닫기

완성된 Recover 코드를 보면 다음과 같다 :

원래 시작보다 중간이 더 어려운 거라고 했나요..
누가 그랬더라.. 하지만 뭐든지 "지옥의 중간 과정"을 잘 넘어가면 더 깊은 깨달음이 있을 거라는 얘기를 어디선가 들은 것 같아!!
그러니까 포기하지 않는 것이 중요한 것이겠쬬 움움
다음 Week 5도 강의 듣고 내용 정리해서 오겠습니다아 ~.~ 화 이 팅 얏호!
'CS50' 카테고리의 다른 글
| [CS50] Week 5 Review (4) | 2024.10.28 |
|---|---|
| [CS50] Week 4 Section (1) | 2024.10.10 |
| [CS50] Week 4 Review (4) | 2024.10.09 |
| [CS50] Pset 3 : Sort, Plurality, Runoff (1) | 2024.10.06 |
| [CS50] Week 3 Section (2) | 2024.10.03 |